Dreamweaver Tutorial > The Dreamweaver work area
Dreamweaver Tutorial > The Dreamweaver work area |
Let's start with a brief overview of the Dreamweaver work area.
| If you haven't already launched Dreamweaver, double-click the Dreamweaver icon to launch it. |
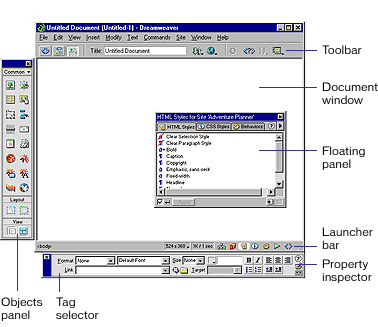
The Dreamweaver work area accommodates different styles of working and levels of expertise. When you launch Dreamweaver, the following work area items open:

| The Document window displays the current document as you create and edit it. | |
| The Objects panel contains icons you click to insert objects in your document, and to change the way you work in a document. | |
| Dreamweaver provides many floating panels, such as the HTML Styles panel and the Code inspector, which enable you to work with other Dreamweaver elements. | |
| The Launcher bar contains buttons for opening and closing your most frequently used inspectors and panels. | |
| The Property inspector displays properties for the selected object or text, and lets you modify those properties. (Which properties appear in the inspector depend on the object actively selected in the document.) |
To open Dreamweaver's windows, inspectors, and panels, use the Window menu. A check mark next to an item in the Window menu indicates that the named item is currently open (though it may be hidden behind other windows). To display an item that isn't currently open, choose the item name from the menu or use its keyboard shortcut.
Dreamweaver can display a document in three ways: in Design view, in Code view, and in a split view that shows both the design and code. (To change the view in which you're working, select a view in the Dreamweaver toolbar.) By default, Dreamweaver displays the Document window in Design view.
In addition, you can work with Dreamweaver's Design view in two different ways—in Layout view and Standard view. (You select these views in the View category of the Objects panel.) In Layout view you can design a page layout, insert graphics, text, and other media; in Standard view, in addition to inserting graphics text and media, you can also insert layers, create frame documents, create tables, and apply other changes to your page—options that aren't available in Layout view.
How the tutorial files are arranged
Both the completed and partially completed HTML files used in this tutorial are in the Compass_Site folder in the Tutorial folder. Images and other associated files for the site are also in the Compass_Site folder.
Each tutorial file has a meaningful name—for example, the HTML file that contains travel destination information is named Destinations.html. The partially completed files—which you'll be working on—have names similar to their completed file counterparts, except they begin with DW4_; the partially completed version of Destinations.html, for example, is called DW4_Destinations.html.
Preview the completed Web site
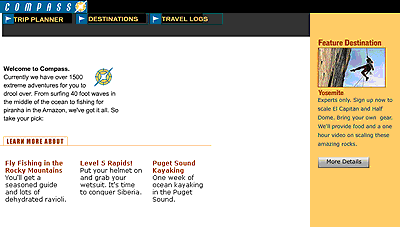
Next, view pages in the completed Web site to get an idea of what you'll be working toward.
| 1 | If you haven't already done so, launch Dreamweaver. |
| 2 | In Dreamweaver, choose File > Open. In the file browsing dialog box, navigate to the Dreamweaver 4 folder (where you installed Dreamweaver); then navigate to Tutorial/Compass_Site. |
| 3 | In the Compass_Site folder, select CompassHome.html, and then click Open to open the Compass home page in the Document window. |
| Do not edit this page; you will create your own version of this page. | |
| 4 | Choose File > Preview in Browser and select a browser in which to view the Compass home page. (Use a version 4.0 or later browser to view this site.)

|
| 5 | Move the pointer over the navigation buttons to see rollover image effects. |
| Click the navigation buttons to explore the site. | |
| 6 | Close the browser when you're finished looking at the site. |
| 7 | Open a new blank document in Dreamweaver, choose File > Open. |
| 8 | Close the CompassHome.html file, which is open in Dreamweaver. |
![]()