Planning and Setting Up Your Site > Using Dreamweaver to set up a new site
Planning and Setting Up Your Site > Using Dreamweaver to set up a new site |
Using Dreamweaver to set up a new site
Once you create your site structure (see Organizing the site structure), you must designate the new site in Dreamweaver. Setting up this local site in Dreamweaver means that you can use Dreamweaver with FTP to upload your site to the Web server, automatically track and maintain your links, and collaboratively share files. It is best to set up your local site in Dreamweaver before you begin creating your pages.
The local site is the site structure that you set up on your computer to contain all your folders, assets, and files for a particular site (see Organizing the site structure).
The local root folder of your site should be the folder you set up specifically for that site. One good organizational approach is to create a folder named Sites, and then create local root folders inside that folder, one local root folder for each site you're working on.
To create a new site:
| 1 | Choose Site > New Site. |
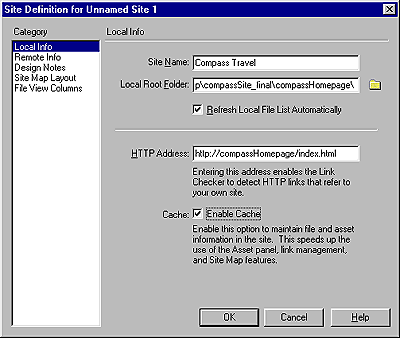
In the Site Definition dialog box that appears, the Local Info category is selected.

|
|
| 2 | Enter the following options: |
| In the Site Name field, enter a name for the site. The site name appears in the Site window and on the Site > Open Site submenu. Use any name you like, it will not appear in the browser and is only for your reference. | |
| In the Local Root Folder field, specify the folder on your local disk where site files, templates, and library items will be stored. When Dreamweaver resolves root-relative links, it does so relative to this folder (see Root-relative paths). Click the folder icon to browse to and select the folder, or enter a path and folder name in the text field. If the local root folder does not yet exist, create it from within the file-browsing dialog box. | |
| For the Refresh Local File List Automatically option, indicate whether or not to automatically refresh the local file list every time you copy files into your local site. Deselecting this option improves the speed of Dreamweaver when copying such files, but when this option is deselected, the Local pane of the Site window does not automatically refresh. To manually refresh the Site window, click the Site window's Refresh button. To manually refresh the Local pane only, choose View > Refresh Local in the Site window (Windows) or Site > Site Files View > Refresh Local (Macintosh). | |
| In the HTTP Address field, enter the URL that your completed Web site will use, so that Dreamweaver can verify links within the site that use absolute URLs. (See Checking links in a page or site.) For example, the absolute HTTP address for Macromedia's Web site is http://www.macromedia.com. | |
| For the Cache option, indicate whether or not to create a local cache to improve the speed of link and site management tasks. If you do not select this option, Dreamweaver will ask you if you want to create a cache again before it creates the site. It is a good idea to select this option because the Assets panel only works if a cache is created. For more information about the Assets panel, see Asset management overview. | |
| 3 | Click OK. |
The Site Files window opens. For more information about the site window and site management, see Site management and collaboration overview.
Later, when you're ready to publish the site on a remote server, you will need to add additional information about the site. For information about remote sites, see Setting up a remote site.