Site Management and Collaboration > About WebDAV and SourceSafe integration > Using Dreamweaver with the WebDAV protocol
Site Management and Collaboration > About WebDAV and SourceSafe integration > Using Dreamweaver with the WebDAV protocol |
Using Dreamweaver with the WebDAV protocol
You can use Dreamweaver to connect using the WebDAV (Web-based Distributed Authoring and Versioning) protocol if you have a system that supports that protocol. Two examples of WebDAV servers currently available are Microsoft Internet Information Server (IIS) 5.0 and Apache Web Server.
To connect to a site using the WebDAV protocol:
| 1 | Choose Site > Define Sites. |
| 2 | In the Define Sites dialog box, select Edit. |
| 3 | In the Site Definition dialog box, select the Remote Info category. |
| 4 | In the Access pop-up menu, choose WebDAV. |
| 5 | If you want, select the Check Out Files when Opening to check out files automatically when opening. |
| 6 | Click Info.

|
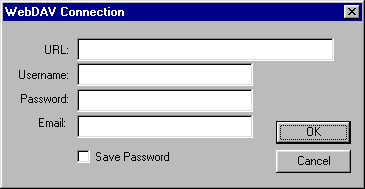
| The WebDAV Connection dialog box appears. | |
| 7 | In the URL field, enter the complete URL to the directory on the WebDAV server that you want to connect to. |
| This URL includes the protocol, port, and directory (if not the root directory)—for example, http://apache1/WebDAV/mysite. | |
| 8 | Enter your username and password in the appropriate fields. |
| This information is for server authentication and is not related to Dreamweaver. If you are not sure of your username and password, check with your system administrator or webmaster. | |
| 9 | In the Email field, enter your e-mail address. |
| This is required and is used to identify ownership on the WebDAV server and appears in the Site window for contact purposes. | |
| 10 | Click Save Password to store your password once you've exited Dreamweaver. |
| Each time you start a new session, the password is still saved. | |
| 11 | Click OK. |
| 12 | Choose Site > Connect or click the Connect button on the Site window toolbar to connect to the remote site. To disconnect, choose Site > Disconnect or click the Disconnect button. |
Once connected, you can use the Dreamweaver's file sharing features (Get and Put files, Design Notes, and so on).
You can change your connection information at any time by following the steps just listed and entering the new information in the WebDAV Connection dialog box.