Using Tables to Present Content > Inserting a table
Using Tables to Present Content > Inserting a table |
Use the Objects panel or the Insert menu to create a new table.
To insert a table:
| 1 | Do one of the following: |
| In the Document window, place the insertion point where you want the table to appear, then click the Table button on the Common category of the Objects panel, or choose Insert > Table. | |
| Drag the Table button from the Objects panel to the desired insertion point on the page. | |
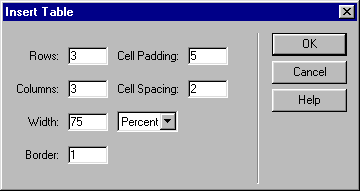
| The Insert Table dialog box appears. | |
| 2 | In the dialog box, accept the current values or type new values. |
Note: The Insert Table dialog box retains the values of the most recent settings you entered for a table.

|
|
| In the Rows field, specify the number of table rows. | |
| In the Columns field, specify the number of table columns. | |
| In the Cell Padding field, specify the number of pixels between the cell content and the cell boundary (or wall). The default padding is 1 pixel. Enter 0 for no padding. | |
| In the Cell Spacing field, specify the number of pixels between each table cell. The default spacing is 2 pixels. Enter 0 for no spacing. | |
| In the Width field, specify the width of the table as a number of pixels or as a percentage of the browser window. | |
| In the Border field, specify the pixel width of the table border. Enter 0 if you don't want a border. | |
| 3 | Click OK to create the table. |
If you want to insert a table without having to first specify these options, turn off the Show Dialog When Inserting Objects option in the General preferences. See Setting preferences.