Dreamweaver Tutorial > Add content to the page
Dreamweaver Tutorial > Add content to the page |
Now that you've laid out the areas of the page, you'll add the graphical content, such as the logo, and rollover images.
You'll learn two ways to insert images in Dreamweaver—using Dreamweaver's main menu and using the Objects panel.
| 1 | Click anywhere in the logo layout cell (the topmost layout cell). |
Clicking in a layout cell places the insertion point in the cell without selecting the cell.

|
|
| 2 | Choose Insert > Image. |
| 3 | In the Select Image Source dialog box, locate the Compass_Site folder and navigate to the Assets folder, then the images folder; click the compass_logo.gif to select it. |
| 4 | Make sure the Relative To pop-up menu located at the bottom of the dialog box is set to Document, then click Select (Windows) or Open (Macintosh) to select the image. |
The image appears in the layout cell.

|
|
| 5 | Click anywhere in the Learn More About layout cell to place the insertion point in the cell. |
| 6 | In the Objects panel's Common category, click the Insert Image icon. |
| 7 | In the Select Image Source dialog box, locate the Compass_Site/Assets/images folder, and navigate to learnMoreAbout.gif; then click Select (Windows) or Open (Macintosh) to select the image. |
| The image appears in the layout cell. | |
| 8 | Choose File > Save to save the changes you made to the home page. |
A rollover image is an image whose display changes when the pointer passes ("rolls") over it.
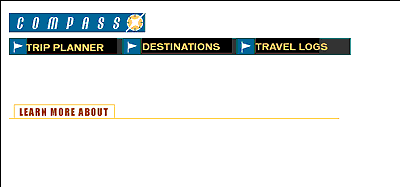
You'll use Dreamweaver's Insert Rollover Image command to create three rollover images for the navigation buttons—Trip Planner, Destinations, and Travel Logs.
A rollover image consists of two images: the image displayed when the page first loads in the browser, and the image displayed when the pointer moves over the original image. Be sure to use images that are the same size. The first image dictates the size of the display, so if the second image is much smaller or much larger, the results will look distorted or unprofessional.
Next, you'll add a navigation button with a rollover image to your page. Then you'll add the other navigation buttons and preview the page in a browser to test the rollovers.
| 1 | In the Document window, click in the first cell of the navigation button table. |
| This tells Dreamweaver where you want the image inserted. | |
| 2 | To insert a rollover image, do one of the following: |
| In the Common category of the Objects panel, click the Insert Rollover Image icon. | |
| Choose Insert > Interactive Image > Rollover Image. | |
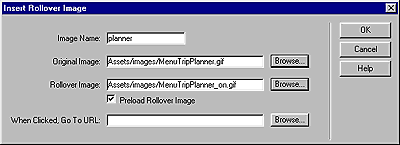
| 3 | In the Insert Rollover Image dialog box, type planner in the Image Name field. |
| This gives the image a unique name, and makes it easily identifiable in the HTML code. | |
| 4 | In the Original Image field, click Browse; then navigate to MenuTripPlanner.gif and click Select (Windows) or Open (Macintosh). |
| This tells Dreamweaver which image to display when the page first loads. | |
| 5 | In the Rollover Image field, click Browse; then navigate to MenuTripPlanner_on.gif and click Select (Windows) or Open (Macintosh). |
| This tells Dreamweaver which image to display when the pointer is over the original image. | |
| 6 | Make sure the Preload Rollover Image option is selected so the rollover images load when the page loads in the browser, ensuring a quick transition between images when a user moves the pointer over the original image.

|
| 7 | Click OK to close the dialog box. |
| The image appears in the document. | |
| 8 | Resize the layout cell to fit the image. |
Create the other rollover images
Now you'll add rollover images for the other navigation buttons.
| 1 | In the Document window, click in the second navigation button cell; then in the Common category of the Objects panel, click the Insert Rollover Image icon. |
| 2 | In the Insert Rollover Image dialog box, type destinations in the Image Name field to provide the image a unique name. |
| 3 | In the Original Image field, click Browse, then navigate to and select MenuDestinations.gif. |
| 4 | In the Rollover Image field, click Browse, then navigate to and select MenuDestinations_on.gif. |
| 5 | Make sure the Preload Rollover Image option is selected, then click OK to close the dialog box. |
| 6 | In the Document window, click in the third navigation button cell; then in the Objects panel's Common category, click the Insert Rollover Image icon. |
| 7 | In the Insert Rollover Image dialog box, type travellog in the Image Name field to provide the image a unique name. |
| 8 | In the Original Image field, click Browse then navigate to and select MenuTravelLogs.gif. |
| 9 | In the Rollover Image field, click Browse then navigate to and select MenuTravelLogs_on.gif. |
| 10 | Make sure the Preload Rollover Image option is selected, then click OK to close the dialog box. |
| 11 | Resize the two layout cells to fit the image. |
You cannot view rollover behavior in Dreamweaver's Document window; rollover images work only in a browser. However, you can preview the document in Dreamweaver to see its browser-related functions. You do not have to save the document before you preview it.
| 1 | Press F12 to see your document in a Web browser.

|
| Move the mouse pointer over the rollover images you created to see them change. | |
| 2 | When you finish previewing the file, close the browser window. |
| 3 | Return to Dreamweaver's Document window and choose File > Save to save the changes you made to the home page. |
Now you'll add text in the cells of the bottom layout table.
In Dreamweaver, you can type content directly into a layout cell, or you can cut and paste content from another document into a layout cell. In this tutorial, you'll add text to the layout cell by copying and pasting content from an existing text file to a layout cell.
| 1 | Choose File > Open; then, in the Compass_Site folder, open DW4_HomeText.txt. |
| The DW4_HomeText.txt document opens in a new Dreamweaver Document window. | |
| 2 | In DW4_HomeText.txt select the first two lines of text, "Fly Fishing" through "ravioli." |
| 3 | Choose Edit > Copy to copy the text. |
| 4 | In the my_CompassHome document, click in the first layout cell in the text-description layout table. |
| 5 | Choose Edit > Paste to paste the text into the layout cell. |
| 6 | In DW4_HomeText.txt select the next two lines of text, "Level 5 Rapids" through "Siberia." |
| 7 | Choose Edit > Copy to copy the text. |
| 8 | In the my_CompassHome document, click in the second cell in the text description layout table. |
| 9 | Choose Edit > Paste to paste the text into the layout cell. |
| 10 | In DW4_HomeText.txt select the last two lines of text, "Puget Sound Kayaking" through "Puget Sound." |
| 11 | Copy the text, then paste it in the third cell in the layout table. |
| 12 | Close DW4_HomeText.txt, then click in the my_CompassHome.html to make it the active document. |
You can format text in the Document window by setting properties in the Property inspector. First, select the text you want to format, then apply the changes. You'll change the font type and size of the text.
| 1 | If the Property inspector isn't open, choose Window > Properties. |
| 2 | In the first text description layout cell, select all the text from the word "Fly," through the last word "ravioli." |
| 3 | In the Property inspector's second Format pop-up menu, which currently reads Default Font, select Verdana, Arial, Helvetica, sans-serif. |
| 4 | In the Size pop-up menu, select 2. |
| The text in your document automatically updates to reflect the changes. | |
| 5 | Repeat the above steps to select and format the text in the other two text-description layout cells. |
Now you'll apply additional formatting changes to the text; you'll apply color and style to create heading text.
| 1 | In the first text description layout cell, select the heading text from the word "Fly," through the word "Mountains." |
| 2 | In the Property inspector, click the color picker; then move the eyedropper to the Learn More About image in the document window and select the brown color of the text in the image. |
| 3 | Still in the Property inspector, click the B icon to apply bold style to the text. |
| 4 | Repeat the above steps to apply color and style to the heading text in the other text description layout cells. |
| 5 | Press F12 to preview your page in a browser. |
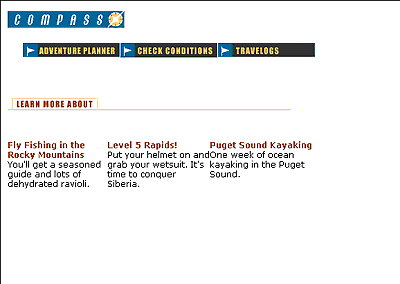
Your page should look similar to the page below.

|
|
| Notice the text. There is little separation between text in one layout cell and the next. You'll fix that in the upcoming tutorial steps. | |
| 6 | Close the browser window, then click in the Document window to make it active. |
![]()