Dreamweaver Tutorial > Work in Standard view
Dreamweaver Tutorial > Work in Standard view |
Layout view is helpful for laying out Web pages. Though you can adjust most of your design elements in Layout view, certain changes must be completed in Standard view. When you switch to Standard view, you'll see how Dreamweaver uses tables to create your page structure. The Layout tables in Layout view are <table> tags in Standard view.
Now you'll learn how to work with tables to continue fine-tuning your design. First, you'll switch to Dreamweaver's Standard view.
| In the Objects panel, click the Standard View icon. | |
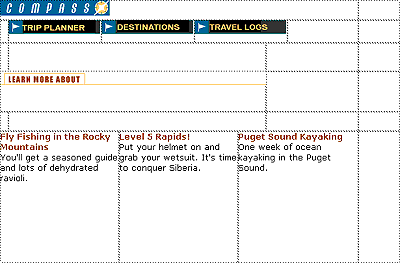
Your page should look similar to the screen below.
|
Cell height determines the height of the space within a cell row. Notice the space around the Compass logo. You want to remove the extra space between the logo and navigation buttons.
| 1 | Click anywhere in the blank area of the cell containing the Compass logo image (but not the image itself). |
| 2 | In the cell Property inspector, in the H field (height), that currently contains a value, delete the value. |
| 3 | Still in the Property inspector, click the Bg color box icon located in the bottom area of the Property inspector; then use the eyedropper to select black. |
| The background color is applied to the cell. | |
| 4 | Click anywhere in the Document window to see the change. |
Next you'll adjust the space in the navigation button table. The easiest way to select a table in Standard view is by using the tag selector, which displays HTML tags of elements in the document.
You'll use the tag selector to select the table containing the navigation buttons.
| 1 | Click in the cell that contains the Trip Planner image. |
Notice the tag selector at the bottom left of the Document window.

|
|
| Note: The tags in your tag selector may vary based on the number of tables you created while in Layout view. | |
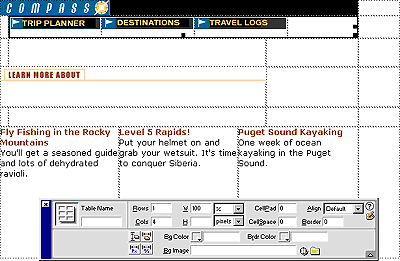
| 2 | In the tag selector, click the rightmost <table> tag. |
In the Document window a border appears around the navigation button table, and the Property inspector now reflects properties for a table.
|
|
Now you'll use the table Property inspector to clear the extra space in the navigation buttons table and to add a background color in the table.
| 1 | In the Property inspector, click the Clear Row Heights icon. It's the top left button in the lower half of the Property inspector. |
| The extra space is removed from the table. | |
| 2 | Still in the Property inspector, click the Bg Color color box icon, then use the eyedropper to select the color black. |
| The black background color is applied to the navigation buttons table. | |
Next, you'll make changes to the cells that contain text. As you can see, the text is too close the edges of the cells. You'll add padding to the cells to leave room between the text and cells.
| 1 | Click in the first cell in the text description table. |
| 2 | In the tag selector, click the rightmost <table> tag to select the table. |
| 3 | In the Property inspector's CellPad field, type 10 to add 10 pixels of space between the text and the table cells. |
| 4 | Click anywhere in the Document window to see the changes. |
| 5 | Save your document. |
To see a high-level representation of the structure of a local site, you use Dreamweaver's Site Map view. You can also use the site map to add new files to the site; to add, remove, and change links; and to create a graphic file of the site that you can export to and print from an image-editing application.
The site map always displays the home page for a site at the top of the map; below the home page you can see which files the home page links to.
There are a number of ways to define a site's home page. The easiest way to set a home page is by using the context menu within the Site window.
| 1 | Click the title bar of the Site window to make it active. (If the Site window is not visible, choose Window > Site Files.) |
| 2 | In the Site window's Local Folder list, right-click (Windows) or Control-click (Macintosh) the my_CompassHome.html document; then in the context menu, choose Set as Home Page. |
| 3 | Click the Site Map icon in the top left area of the Site window; then in the Site Map pop-up menu, select Map and Files.
|
The Site window now appears with two views of your local site: on the left is a site map, which graphically represents the current structure of the Compass site (with my_CompassHome.html as the home page), and on the right is a list of the local folder's contents.
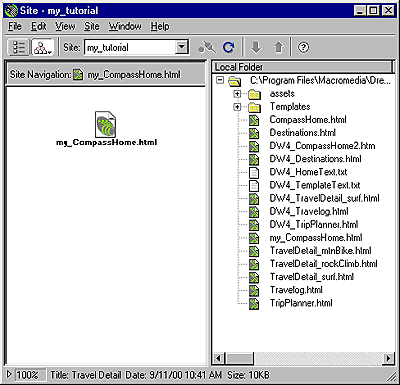
The my_CompassHome.html page currently has no links. You'll add links to this page in the next section of this tutorial.
Leave the Site window open for now, so you can see how the site map updates as you add links to the home page.
Images in the top area of the Compass home page guide visitors to specific pages in the site. Now you'll add links for the navigation buttons.
You'll see that there are a number of ways to create links using Dreamweaver. First, you'll add a link from the Trip Planner image to the TripPlanner.html page using the Property inspector.
| 1 | In the Site window, double-click the icon for the my_CompassHome.html file in either pane. |
| The my_CompassHome.html file becomes the active window. | |
| 2 | In the Document window, click the Trip Planner image once to select it. |
| 3 | Choose Window > Properties to open the Property inspector if it isn't already open. |
The Property inspector displays information about the selected image.

|
|
| Note: The Link field contains a number sign (#), often referred to as a null or "dummy" link, created when you inserted the rollover image. Don't remove this character. It will soon be replaced with the file name of the document you link to. | |
| 4 | In the Property inspector, click the folder icon to the right of the Link field. |
| 5 | In the Select File dialog box, browse to the Compass_Site folder and then to DW4_TripPlanner.html; click Select (Windows) or Open (Macintosh) to select the file to open when the Trip Planner button is clicked. |
| The file name appears in the Link field of the Property inspector. Now you'll add a link to the Destinations image using the Property inspector and the Site window. | |
| 6 | Click the title bar of the Site window to make it active, or choose Window > Site Files. Resize your Document window, if necessary, so that you can position the left side of the Document window and the Site window side by side. |
| 7 | In the Document window, click the Destinations image to select it. |
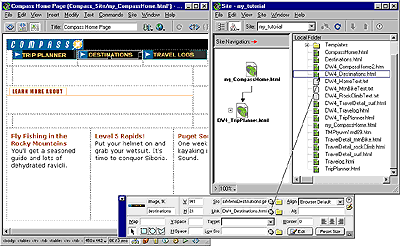
| 8 | In the Property inspector, click the Drag to File icon (located to the right of the Link field), then drag the pointer to the Site window; in the Local Folder List, point to the file DW4_Destinations.html.
|
| The file name appears in the Link field in the Property inspector for the products image. | |
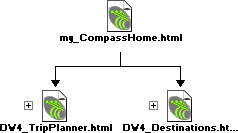
| 9 | Click the Site Map icon in the Site window. The site map updates to reflect the link you added.
|
| A plus (+) sign next to any file in the site map indicates that the file contains links to other documents. Click the plus sign to expand the site map to display the associated files; click the minus (-) sign to collapse the site map. | |
| Next, you'll add a link for the Travelogs image. | |
| 10 | In the Document window, click the Travelogs image to select it. |
| 11 | In the Property inspector, drag the Point-to-File icon to the Site window, and point to the file DW4_Travelog.html. |
| 12 | Choose File > Save to save the changes you've made to the home page. |
You can't test your links in Dreamweaver, you must check your links in a browser to make sure the pages operate as you expect.
| 1 | Press F12 to preview the page in a browser. |
| Click the navigation buttons to check your links. Click your browser's back button to return to your home page. | |
| 2 | When you're finished testing your page, choose File > Close to close the page. |
![]()