Designing Page Layout > Setting layout width > Using spacer images
Designing Page Layout > Setting layout width > Using spacer images |
A spacer image is a transparent image that does not show in the browser window, but is used to control spacing in autostretch tables. The spacer image maintains the width you set for each table and cell on the page. If you choose not to use spacer images in autostretch tables, columns will change size or even visually disappear completely if they do not contain content.
You can insert and remove spacer images in each column or let Dreamweaver add them automatically when creating an autostretch column. Columns that contain spacer images have a double bar along the top.
When you insert a spacer image in a column or set a column to autostretch, a dialog box appears that asks how you want to set up your spacer image file. If you have already set a spacer image for the site in the Dreamweaver preferences, the dialog box does not appear. See Setting Layout View preferences.
To set up your spacer image:
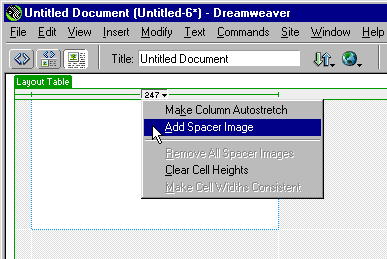
| 1 | Set a column to autostretch or choose Add Spacer Image from the Column Header menu.

|
| 2 | In the dialog box that appears, choose from the following options: |
| Tell Dreamweaver where to create the spacer image file: If you select this option and click OK, another dialog box appears to let you navigate to the directory in your site where you would like to store the spacer image file, such as an images folder. This is the recommended choice. | |
| Browse to an existing spacer image file: If you have already created a spacer image file for your site, choose this option and then navigate to your spacer image in the next dialog box that appears. The spacer image should be a 1 pixel by 1 pixel transparent GIF. | |
| Turn off spacer images for autostretch columns: If you select this option, a dialog box appears that warns you that the other columns in your layout may collapse to a small width. When you choose not to use spacer images, the widths of your columns will be as small as the content in them. Columns without content will collapse to nothing. The spacer images help maintain the structure of your layout as you originally drew it. | |
You can insert and remove spacer images in specific columns or remove all spacer images in the page.
To insert a spacer image into a column:
Select Add Spacer Image from the column header menu. The spacer image will be inserted into the column. You will not see the image, but the column may shift slightly and a double bar will appear at the top.
To remove a spacer image from a column:
Select Remove Spacer Image from the column header menu. The spacer image will be removed and the column may shift.
To remove all spacer images from your page:
Select Remove all Spacer Images from the column header menu or click the Remove all Spacers button in the layout table Property inspector. Your whole layout may shift slightly or dramatically depending on your content. If there is no content in some columns, the columns may disappear completely.