Designing Page Layout > Drawing layout cells and tables
Designing Page Layout > Drawing layout cells and tables |
Drawing layout cells and tables
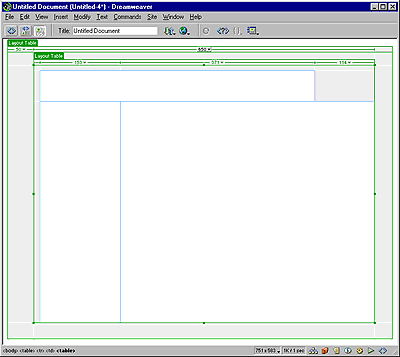
You can draw layout cells and tables on your page when in Layout view. If you create a layout cell first, a layout table will also automatically be inserted to act as a container for the layout cell. A layout cell will always be in a layout table.
Note: The Layout table that is automatically created by Dreamweaver is the width of your Document window. You can resize it or make it autostretch as necessary.
To draw a layout cell:
| 1 | Make sure you are in Layout view, then click the Draw Layout Cell button in the Layout category of the Objects panel. The mouse pointer will change to a plus sign (+). |
| 2 | Position the mouse pointer where you want to start the cell on the page, then drag to create the layout cell. To create a number of cells without clicking the layout cell button each time, hold down Control (Windows) or Command (Macintosh). |
The cell will appear outlined in blue on your page. Blue is the default outline color for layout cells, see Setting Layout View preferences to change it. The size of each cell is displayed in the column header area along the top of the cell. For more information about width, see Setting layout width.
Your page layout follows a grid with columns and rows, so cells can span several rows or several columns, but they can never overlap each other on the page. Dreamweaver helps you maintain this structure by automatically snapping new cells that you create to existing cells if you draw them near each other (within 8 pixels). The cells will also automatically snap to the side of the page if you draw them close to the edge (within 8 pixels). To temporarily disable snapping, hold down Alt (Windows) or Option (Macintosh) while drawing the cell on the page.

This does not mean that all of your cells must be the same size or width. You can have cells in the same column that are different widths, or cells in rows that have different heights.
To draw a layout table:
| 1 | Make sure you are in Layout view, then click the Draw Layout Table button in the Layout category of the Objects panel. The mouse pointer will change to a plus sign (+). |
| 2 | Position the mouse pointer on the page, then click and drag your mouse to create the layout table. If it is the first table you have drawn on the page, it will automatically be positioned at the top left corner of your page. |
| To create a number of tables without clicking the layout table button each time, hold down Control (Windows) or Command (Mac). | |
The table will appear outlined in green on your page. Green is the default outline color for layout tables, see Setting Layout View preferences to change it. A Layout Table tab also appears at the top of each table you draw and helps you distinguish and select the table. The size of each table is displayed in the Column Header area along the top of the table.

For more information about width, see Setting layout width.
Tables cannot overlap each other. Your page layout follows a grid with columns and rows, so tables can span several rows or several columns, but they can never actually overlap on the page. Dreamweaver helps you maintain this structure by automatically snapping new tables that you create to existing tables or cells if you draw them near each other (within 8 pixels). The tables will also automatically snap to the side of the page if you draw them close to the edge (within 8 pixels). To turn off snapping, hold down Alt (Windows) or Option (Mac) while drawing the table on the page.
You can create layout tables into empty areas of your page layout, into an existing layout table (nesting), or around existing layout cells and tables. When you create a Layout table in a blank document, it will automatically snap to the upper left corner of your Document window.
Note: If your page already contains content, a layout table can only be drawn below the bottom of the content.
To draw a layout table around existing tables or cells:
| 1 | Make sure you are in Layout view, then click the Draw Layout Table button in the Layout category of the Objects panel. The mouse pointer will change to a plus sign (+). |
| 2 | Click and drag your mouse around existing layout cells or tables. The layout table will enclose the existing cells or tables. |
![]()